| OnScreen with CrossScanner: for Windows; OnScreen Keyboards with Single Switch Access; Version 1.79; User's Guide | ||
|---|---|---|
| Prev | Next | |

Important Note: This dialog box contains advanced user options. In general, most users should ignore these settings.
Select Special Options:
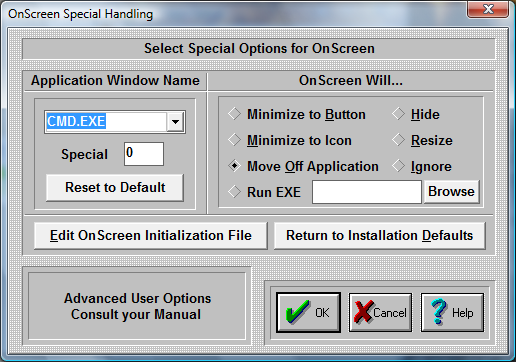
Some Windows applications do not conform to pre-defined Windows standards, or require special handling to work along with OnScreen. Some known applications are included in the Pull-down box box on the left. On the right, click on a Radio-Button to select the action each application should perform to work along OnScreen. You may add new Applications by typing the name in the top box on the left. This will add the Application Name to the list. Once selected, choose one of the options on the right to indicate how OnScreen should react when the selected Application becomes active. To delete an entry, highlight the entire selection, press the Delete key to remove the text, and then press Enter to remove the entry from the list.
Minimize to Button
When OnScreen overlaps the Application, a "Goto Button" command will minimize OnScreen to a Button.
Minimize to Icon
When OnScreen overlaps the Application a "Goto Icon" command will minimize OnScreen to an Icon.
Move Off Application
This will move OnScreen below the Application Window. Note that based on window size and OnScreen size, areas may be moved off screen.
Hide
This option currently matches the Minimize to Icon.
Resize
This will move OnScreen off the window, and resize the Application so that it occupies the rest of the screen area above OnScreen.
Ignore
This option is meant for the user who may want different actions based on changing circumstances, and may not want special action during a period of time.
Run EXE
The ability to Run an Executable file adds great flexibility, and should be used in conjunction with the OnScreen Developers Kit. The executable file is run once until another executable is launched via OnScreen (typically when some other window becomes active that is in the Special Handling list). Primarily this is meant to be used to position or reconfigure OnScreen as different windows become active (different web pages, different applications, etc.). OnScreen only checks the Active window when it is open normally (NOT as an Icon or Button). Also, the React to Dialog and other Windows in Operation Options can override these settings.
Browse
This button will open a File Open Browse Dialog that will let you explore your system to select an executable. For maximum compatibility, only short path & file names are used. When the Run EXE is updated, it is also saved for the currently selected "Application Window Text". If you wish to modify the entry (e.g. add command line options), you must then click on OK to save these changes.
Notes on Application Window Text & Advanced Notes
The entire Caption bar (or entire Window Name) is searched for a match, starting in the order of the Special List. Any part of the window name will match, therefore being specific is important. This substring match can cause problems, especially if the Window Text is common, e.g. "Word" will match WordPad, Microsoft Word, WordPerfect, etc. Because each entry is checked regularly by OnScreen, it can affect system operation as the list grows. This list should be used sparingly with extreme care, and only when using the Developers Kit within a separate Application is not an option.
Edit OnScreen Initialization file:
Pushing this button will allow you to directly edit the contents of the OnScreen initialization file. Caution: Editing the .INI file can cause OnScreen to operate incorrectly! Know what you are editing. Refer to the OnScreen User's Guide section on the Initialization File for complete coverage of this option.
Return to Installation defaults:
If you would like to return all options to the original defaults, press this button. This will replace the current initialization file (ONSCREEN.INI) and the configuration file (KEYBOARD.KBF) with the files from the time of original installation. EVERYTHING will be reset to the configuration at that time (i.e. the time immediately after installation).
As seen in ...
