| OnScreen with CrossScanner: for Windows; OnScreen Keyboards with Single Switch Access; Version 1.78 Release 4; User's Guide | ||
|---|---|---|
| Prev | Chapter 5. OnScreen Setup | Next |

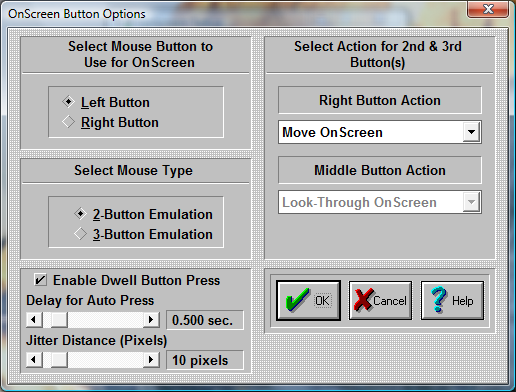
Click on the Mouse Buttons Button

Important: The term Mouse is used generically for any pointing device that moves the cursor (mouse pointer) within Windows. For Pen and Touchscreen drivers, often only 1 button is available (Left Button): In all cases, the Left Button should be selected as the Action button.
OnScreen lets you define functions for all your Mouse buttons (2 or 3 button Mice). This can make you work more efficiently by eliminating frequently used tasks and key combinations.
Select Mouse Button to use on OnScreen Here you define which button on your Mouse is going to be used as a point-and-click button. This button will be the execution button.
Select Type of Mouse
If you have a two-button Mouse, click on 2-Button Mouse. If you have a three-button Mouse, click on 3-Button Mouse.
Note: If you have a three button Mouse, be sure that you are loading the correct driver. If you are loading a two-button Mouse driver with a three-button Mouse, you will not be able to use the middle button. Go to Windows Control Panel | Mouse to install a different Mouse driver.
Mouse Button Action Pull-down Boxes In order to assign a different function to the OnScreen Mouse buttons, do the following steps:
Click on the down-arrow of the 1st Pull-down box.
Use the scroll-bar to scroll up and down within the Pull-down box.
Select a function by clicking on its name.
Press the OK Button.
Repeat the steps 1-4 on the 2nd Pull-down box.
Press the OK Button.
If you do not want to change the current Mouse buttons setup, press the CANCEL button.
This functionality is only available while your Mouse pointer is over OnScreen.
Some of these actions are:
Ignore the button press (no reaction at all)
Move OnScreen around the screen (click and drag)
Look Thru OnScreen (while holding the button down you will be able to see the screen behind OnScreen)
Open the OnScreen Menu
Minimize OnScreen
Choose from a list of single or combination keystrokes, such as [Enter], [F1], [Alt-F4], etc.
Enable Dwell Button Press - When enabled, and the mouse cursor (pointer) hovers (dwells) over OnScreen, a timer based on the "Delay for Auto Press" will begin and continue to count down as long as the pointer itself stays within the "Jitter Distance (Pixels)" from the starting point. Once the delay expires, and automatic Action button press will occur (i.e. Left Button press) at the starting point. This allows a user to operate OnScreen simply by hovering over select keys or buttons for the delay period.
Note: The actual button press occurs at the original point tracked when the delay timer begins, not the position of the mouse cursor at the end of the delay timer
Jitter Distance: Care should be taken to make sure this value is as small as possible that allows the user to be effective. As the setting gets larger, it is possible to visually be over a different key when the mouse button occurs on the original key when the delay timer started. In order to assist users with mouse control difficulties, this aspect may affect users who have good mouse control. Therefore, it is important to take the time to set the correct Dwell timing and Jitter distance for a particular user.
Note: If the mouse cursor moves off of OnScreen, the dwell timer stops.
OnScreen uses a visual display highlight to indicate the key that is currently selected by the dwell timer, and uses a diminishing rectangle. When the rectangle diminishes to nothing, the button press will occur. The visual result will be slightly different if Key Highlighting is enabled. The display itself is a percentage based on the dwell timer, so a longer timer period will cause the rectangle to diminish slower.
As seen in ...
