| Build-A-Board®: for Windows; The Next Generation of Onscreen Keyboards; Version 2.20 Release 5; User's Guide | ||
|---|---|---|
| Prev | Chapter 3. Build-A-Board Operation | Next |
The following lists detailed information about the Build-A-Board menu selections, along with the settings they control.
Note: Menu options will be grayed (disabled) when they are not appropriate, or don't apply based on various selections & settings. Ensure you have the correct/appropriate Key (or Keys) Selected, or check selected options if you are trying to perform a menu option and it is not available.
File Menu
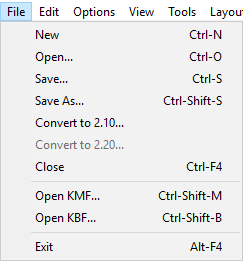
New (Keyboard Shortcut = Ctrl-N)
Creates a New Project (Untitled). You will be asked to save the current project if necessary.
Open... (Keyboard Shortcut = Ctrl-O)
Opens an existing Project. You will be asked to save the current project if necessary prior to opening another.
Save... (Keyboard Shortcut = Ctrl-S)
Saves the current project - if no name selected, it will be saved as Untitled.
Save As... (Keyboard Shortcut = Ctrl-Shift-S)
Saves the current project with the name specified.
Convert to 2.10...
This will only be enabled for 2.20 / Level 2 projects. The Key Properties for the layout are updated, and saved in the Level 1 format. You will be prompted for a new Project name (Save As...). Converting to 2.10 will lose extended key information, and will not be recoverable if the 2.10 project is converted back to 2.20. This conversion is only recommended for projects that were created as 2.20 and the 2.10 layout is needed due to legacy run-time software.
Convert to 2.20...
This will only be enabled for 2.10 / Level 1 projects. The Key Properties for the layout are updated, and saved in the Level 2 format. You will be prompted for a new Project name (Save As...). Defaults are used for 2.20 / Level 2 values that are not in a 2.10 / Level 1 project.
Close (Keyboard Shortcut = Ctrl-F4)
Will ask to save if necessary. This will compress all project files into 1 "Closed Project File" and remove the current project from the Build-A-Board workspace.
Open KMF... (Keyboard Shortcut = Ctrl-Shift-M)
This will open a KMF file from pre 2.00 versions. There is no editing available for KMF files, and for display purposes, a matching pre 2.00 KBF file must be available. For more information on KMF Files and details on this option, see KMF File Notes.
Note: More advanced capabilities for this option will be available in the future.
Open KBF... (Keyboard Shortcut = Ctrl-Shift-B)
This will open an existing KBF file from pre 2.00 versions. Limited Editing is available - the ability to hide keys (Key Properties), and resize keys can be handled within the current version. For more information on KBF Files and details on this option, see KBF File Notes.
Note: More advanced capabilities for this option will be available in the future, including the ability to automatically extract KBF files to Source projects.
Exit (Keyboard Shortcut = Alt-F4)
This will Exit & Close Build-A-Board - you will be asked if you wish to save the current project (if necessary).
Edit Menu
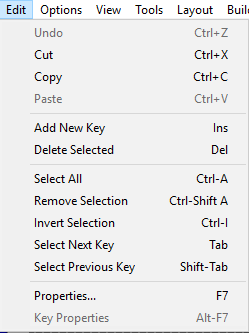
Undo (Keyboard Shortcut = Ctrl+Z)
Reverses the previous action(s) - up to 25 undo levels are supported
Cut (Keyboard Shortcut = Ctrl+X)
Copies the selected key(s) to the clipboard, and deletes them from the current project.
Copy (Keyboard Shortcut = Ctrl+C)
Copies the selected key(s) to the clipboard.
Paste (Keyboard Shortcut = Ctrl+V)
Pastes the current clipboard contents onto the Panel.
Add New Key (Keyboard Shortcut = Ins)
This Adds a key onto the panel. The default size is 20 pixels wide, 30 pixels high.
Delete Selected (Keyboard Shortcut = Del)
This deletes any selected keys.
Select All (Keyboard Shortcut = Ctrl-A)
Selects all keys on the Panel.
Remove Selection (Keyboard Shortcut = Ctrl-Shift A)
Removes selection from all keys.
Invert Selection (Keyboard Shortcut = Ctrl-I)
Selects all currently non-selected keys, and removes the selection from currently selected keys.
Select Next Key (Keyboard Shortcut = Tab)
Selects and highlights the next key in the internal order.
Select Previous Key (Keyboard Shortcut = Shift-Tab)
Selects and highlights the previous key in the internal order.
Properties... (Keyboard Shortcut = F7)
Opens the Property page for the Panel - you may also access Global Settings from this page (Global Settings tab)
Key Properties... (Keyboard Shortcut = Alt-F7)
Opens the Key Property page for the current actively selected Key (if available).
Options Menu
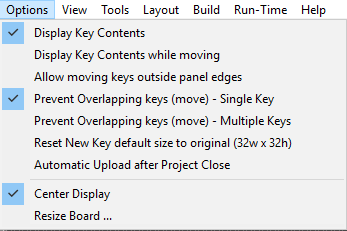
Display Key Contents
When selected On, this will show the Key Contents. This is default On, you would only want this off if you have a slower system with a slow video card, or notice paint delays on the keys while working within Build-A-Board.
Display Key Contents while moving
This is default Off, as it repaints the keys while you are moving them. This should only be On for fast systems with high-speed video capabilities.
Allow moving keys outside panel edges
This allows keys to move outside the edges of the panel. It is default Off, and limits keys from moving outside the edges of the panel.
Prevent Overlapping keys (move) - Single Key
This forces a moving key to position itself in a clear area of the board. It is default On - while moving a key, you will notice it "hop" around as it tries to find a clear area to position itself.
Prevent Overlapping keys (move) - Multiple Keys
This monitors all keys during multiple key moves. It is default Off, because often there is not enough free space to position all keys being moved to a clear area. If On, Keys can position constantly if there is not enough free space to position they keys. This should be used with caution, and the awareness that there may not be a possible non-conflict during a multiple key move.
Reset New Key default size to original (32w x 32h)
When working with Keys, you can select the default size for New Keys based on the current Key size. This Option allows you to reset to the 32 pixel wide by 32 pixel high default size.
Center Display
This is default On, and positions the panel in the center of the Build-A-Board work area. When Off, the panel will be positioned in the upper-left of the work area.
Resize Board ...
This opens a dialog to resize the Panel (Board) - you also have the option to resize the keys in proportion to the new sized board.
View Menu
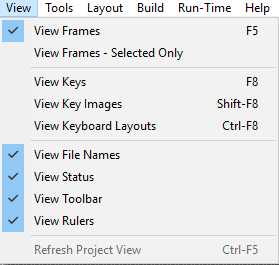
View Frames (Keyboard Shortcut = F5)
View Frames - Selected Only
When View Frames is On, the frames around the keys is shown - for more details on the frames, see Panel Display, Keys.
When viewing frames, you may also select the option to only view the frames of the Selected Keys.
To Show the keys without the selection frames, toggle View Frames to Off. Note that you may still select a key or keys in the same way, but there will not be any visual indication of the current selection. Sizing will need to be done via the keyboard cursor keys (arrows), or the Key property page.
View Keys (Keyboard Shortcut = F8)
This toggles the Window showing the Drag & Drop Keys for the 9 categories - Alpha, Numeric, Edit, All, etc.
View Key Images (Keyboard Shortcut = Shift-F8)
This toggles the Window showing the available Key Images that can be assigned to a board and will be used on all keys that have the HiRes Key Type and have Key Images as the Frame Type.
View Keyboard Layouts (Keyboard Shortcut = Ctrl-F8)
This toggles the Window showing the available Keyboard Layouts and currently selected Keyboard Layouts (KMF Files) that are included with the project, and can be used for {KMF:??} images and [KMF:??] Key Actions. Keyboard layouts can be added and removed from the included layouts with the project / built KBF.
View File Names
View Status
View Toolbar
View Rulers
These 4 items on the View Menu allows you to toggle on & off the display of the various windows within the Build-A-Board workspace.
Refresh Project View
This View option is only available when in the Project Select view - if selected, it will reload the current Source folder, and update the Project View..
Tools Menu
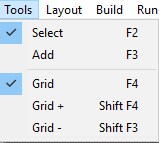
Select (Keyboard Shortcut = F2)
Add (Keyboard Shortcut = F3)
Select & Add are the 2 cursor tools in Build-A-Board - they are mutually exclusive. See Cursor Tools for more details.
Grid (Keyboard Shortcut = F4)
The Grid toggles on & off the grid display within the Panel.
Grid + (Keyboard Shortcut = Shift-F4)
This increases the current Grid size by 1, up to the maximum grid size.
Grid - (Keyboard Shortcut = Shift-F3)
This decreases the current Grid size by 1, down to the minimum grid size.
Layout Menu
The Layout Menu has several sub-menus with options to align, space, size, and center selected keys.
Layout Menu | Align
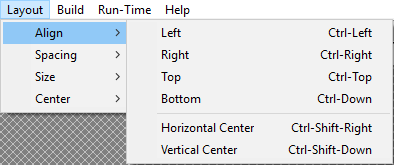
The Align commands all use the active selected key (blue-border) as the alignment anchor.
Left
Positions all selected keys to have the same left-hand position as the active key.
Right
Positions all selected keys to have the same right-hand position as the active key.
Top
Positions all selected keys to have the same top position as the active key.
Bottom
Positions all selected keys to have the same bottom position as the active key.
Horizontal Center
Positions all selected keys to have the same horizontal-center position as the active key.
Vertical Center
Positions all selected keys to have the same vertical-center position as the active key.
Layout Menu | Spacing

The Spacing command uses the minimum & maximum (Horizontal or Vertical) position of currently selected keys, and evenly spaces keys (with 3 options - spacing wins or keys win or fixed pixels).
Horizontal (Even Spacing, Max Key may move)
Forces even spaces between keys, may move the right-hand maximum key to accommodate.
Vertical (Even Spacing, Max Key may move)
Forces even spaces between keys, may move the bottommost maximum key to accommodate.
Horizontal (Min/Max Keys fixed, spacing may be uneven)
The far-left & far-right keys remain fixed, so spacing may be uneven if units do not evenly divide.
Vertical (Min/Max Keys fixed, spacing may be uneven)
The topmost & bottommost keys remain fixed, so spacing may be uneven if units do not evenly divide.
Horizontal (Pixels / Even Spacing, Max Key may move)
Opens a pixel sub-menu to select between 1-10 pixels, forces even spaces between keys, may move the right-hand maximum key to accommodate.
Vertical (Pixels / Even Spacing, Max Key may move)
Opens a pixel sub-menu to select between 1-10 pixels, forces even spaces between keys, may move the bottommost maximum key to accommodate.
Layout Menu | Size
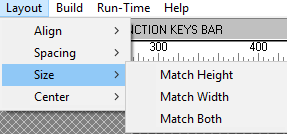
The Size command changes the selected key(s) size to match the active selected key (blue-border).
Match Height
The height of all selected key(s) will match the active selected key.
Match Width
The width of all selected key(s) will match the active selected key.
Match Both
The width & height of all selected key(s) will match the active selected key.
Layout Menu | Center
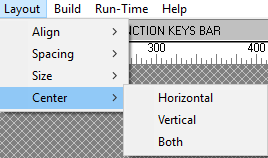
The Center command will center a selected key or key(s) horizontally, vertically, or both.
Horizontal
Center the selected key or key(s) within the width of the panel.
Vertical
Center the selected key or key(s) within the height of the panel.
Both
Center the selected key or key(s) within the width & height of the panel. (Center selected key(s) in panel).
Build Menu

Build (Keyboard Shortcut = F9)
The Build command will save the project, compile the project files, and create the run-time files for the selected target system. By default, a test configuration will be copied into the Target folder for the project to allow you to run & test the current layout. After a successful build, you will be asked if you wish to execute My-T-Soft (from the test configuration). Note: This will close any running instance of My-T-Soft in order to prepare for a new launch.
Execute (Keyboard Shortcut = F10)
This will execute My-T-Soft with the keyboard layout from the last successful build for the project. Note: This will close any running instance of My-T-Soft in order to prepare for a new launch.
Run-Time Menu
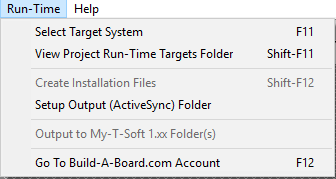
Select Target System (Keyboard Shortcut = F11)
This will open a dialog to let you select the target system from the available target systems.
View Project Run-Time Targets Folder (Keyboard Shortcut = Shift-F11)
This opens Windows Explorer and displays the Project folder in the Target area, which displays all built targets, and provides access to the built KBF file and available Targets for the current project.
Create Installation Files (Keyboard Shortcut = F12)
Creates Installation Files is not enabled in this version. (This is an older option when target platforms were limited and security did not impose as many restrictions on building installation packages - it may be used for certain platforms at some point in the future)
Setup Output (ActiveSync) Folder
This allows you to choose a folder to output the current build after the build is complete. This can be used as the ActiveSync synchronization folder to allow Build-A-Board to copy successfully built target files into (which allows ActiveSync (or any synchronizing utility) to automatically copy to the target system). This also may be used for convenience or as another option for placing built layouts (.KBF files).
Output to My-T-Soft 1.xx Folder(s)
This will be enabled if a suitable member of the My-T-Soft family 1.xx is installed (My-T-Soft / My-T-Touch / My-T-Pen / My-T-Mouse / OnScreen), and there is a built project KBF available. When selected, the [Project Name].KBF will be copied to all available product folders, and will be available from the Custom Build-A-Board keyboard selection option in Setup | Keyboards. You must be sure to target the correct version ANSI 2.10 (1.7x) or UNICODE 2.20 (1.8x +).
Go To Build-A-Board.com Account
If properly licensed, this will open the default browser and go direct to the Licensed User's Build-A-Board.com account for accessing options and layouts from the Build-A-Board.com website. If there is no account information with the license, this will go to the login page.
Help Menu
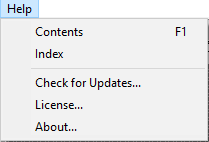
Contents (Keyboard Shortcut = F1)
Opens this Help File from within Build-A-Board to the Table of Contents page.
Index
Opens this Help File from within Build-A-Board to the Index page.
Check for Updates...
Opens the IMG Download Manager and can check for and install product updates.
License...
Opens the IMG License Manager to display current license details and provide tools from the License Manager.
About...
Displays version & contact information for Build-A-Board.
As seen in ...
